|
Background
We read some interesting articles about geocaching and thought it may be
something that we could do together (and would get us out of the house). So in
early July 2005, after putting new batteries into our old Magellan 4000 and
printing out some caches near our house, we confidently headed out to try to
find some treasure! This page describes what we found while geocaching, and
offers some tips and hints for the new Geocacher.
Equipment
The first thing we found out was that our old Magellan 4000 was not really made
for Geocaching. It worked OK when we used it for hiking (to mark our campsite so
we could find our way back if we got lost), but with only 2 receivers it
constantly lost the fix on the satellites, and didn't work under tree cover or
near buildings. We also figured out that we were using the wrong navigation
screen, which made things even harder. After unsuccessfully searching for two
different caches, we tried a third one that we found without the "help" of the
4000.
Global Positioning System receiver (GPSr)
After our experience with our old Magellan 4000 GPSr we decided to check out the
more "modern" GPSr's on the market. We found out that all of the latest models
(Summer 2005) had at least 12 receivers. We also found they were a lot less
expensive then when we purchased the Magellan. After looking at the equipment
offered by Garmin, Lowrance, and Magellan we decided to get the least expensive
model that had had at least 12 receivers.
Lowrance iFinder Go
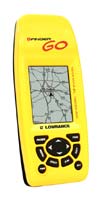
At $75 delivered to our house, the Go certainly doesn't have all of the fancy
features of the upper end models, but it did offer:
-
16
receivers - much better than the 2 receivers in our 4000
-
WAAS
support - can make your GPSr even more accurate
-
Built
in high level map - not really useful for finding a cache, but we did use it
while driving the interstates on our vacation
-
Low enough cost that if we
decided we didn't like Geocaching we wouldn't be stuck with a $200+
paperweight
Some features that upper end models have that we have found can be useful:
-
Higher detailed
built in maps - saves making maps to get to the cache
-
Computer interface - you don't
have to enter each cache coordinates with the up/down arrows on the GPSr, you
can download the coordinates from your computer
After getting the Go, we also figured out which navigation screen to use.
Navigating with your GPSr
When we turn on our GPSr's we get a screen that tells you where you are - nice,
but not helpful when attempting to find a cache. To hunt for a cache you need to
switch to a screen that "points" to a waypoint (the cache), and tells you how
far you have to go until you get there.
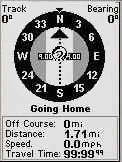 Here's
a sample navigation screen that show you need to go 1.71 miles North to reach
the waypoint "Home". If "Home" has the coordinates of your cache you would
simply have to walk (or drive) 1.71 miles due north to arrive at the cache
location. Note that the navigation screen only points toward the cache when you
are moving, so you need to actually move in order for the arrow to point in the
correct direction. In this example, the cache is 1.71 miles to the North, but
you would have to start walking to find out if North is straight ahead, to the
left, right, etc. Here's
a sample navigation screen that show you need to go 1.71 miles North to reach
the waypoint "Home". If "Home" has the coordinates of your cache you would
simply have to walk (or drive) 1.71 miles due north to arrive at the cache
location. Note that the navigation screen only points toward the cache when you
are moving, so you need to actually move in order for the arrow to point in the
correct direction. In this example, the cache is 1.71 miles to the North, but
you would have to start walking to find out if North is straight ahead, to the
left, right, etc.
GPSr Configuration
There are just a couple more basic GPSr configuration items you need to check.
You need configure your GPSr so it's using the correct map datum (WGS84 is
common), and the correct coordinate system (Degrees Minutes.Hundreds of Minutes
is common - for example: 33° 19.322). You'll have to check your manual or search
through the menus to configure it properly.
Using our new GPSr
Once we configured our GPSr and loaded in the coordinates for the two caches we
couldn't find, we headed out again. This time it was easy. The GPSr never lost
the fix and the navigation screen almost pointed directly to the cache
containers!
Finding a series of caches
If you entered multiple cache locations into your GPSr (by the keyboard or
downloaded them through a computer interface), you can easily go from one cache
to the next by using the "Find Closest" function of your GPSr. The "Find
Closest" function will look at all of your Waypoints and list them in order from
the closest to the furthest away. For example, if you use the "Find Closest"
function right after you find a cache, the cache you just found will be first in
the list, the next cache would be 2nd, etc.
Where are the caches?
There are a number of Geocaching pages on the Internet, but we primarily use
geocaching.com. The site provides a lot
of information about Geocaching, like: its history, how to get started, location
of caches around the world, forums, etc. The next sections give you quick
overview how to use the geocaching.com
site to get and log caches.
Get an account
To actually get the coordinates for caches you need to sign up for a free
account. To create an account you need to click on the
log in hyperlink located at the site. If you are just starting out you
probably don't need to sign up for a Premium Membership until you decide you
actually like Geocaching and want the additional features the you get with a
Premium Membership.
Get local cache information
Once you get your account you'll probably want to see what kind of caches are
near where you live. After you log in you can look on their Home Page and under
"Search for caches..." you can enter your zip code. When you select Go you'll
get a page something like this:
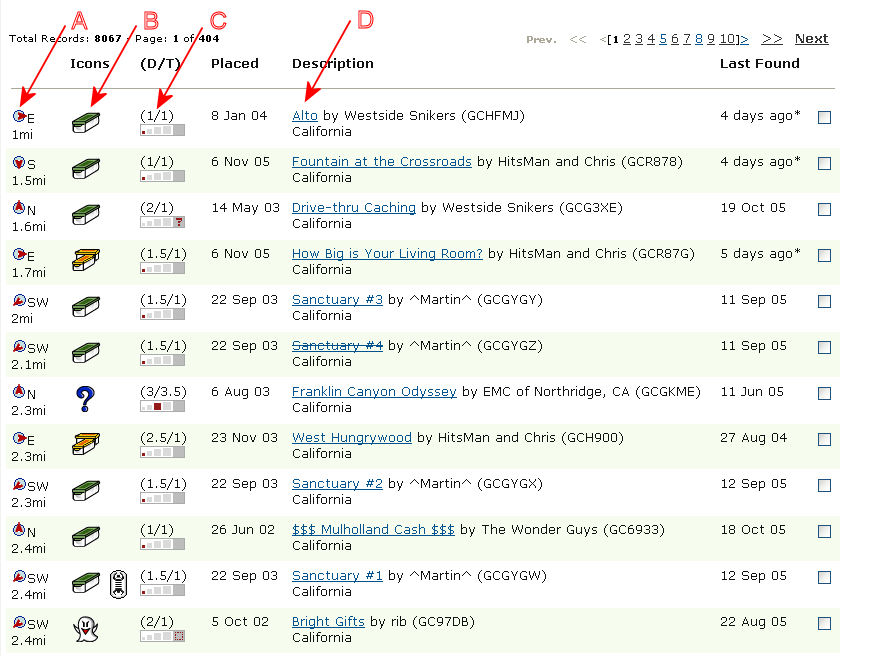
The "A" column shows you how far and what direction the cache is from your
location. The "B" column tells you what kind of cache it at the location. There
are Traditional caches ( ),
Multi-Caches ( ),
Multi-Caches ( ),
Mystery/Puzzle caches ( ),
Mystery/Puzzle caches ( ),
and Virtual caches ( ),
and Virtual caches ( ).
The "C" column shows you how hard it is to find the cache (Difficulty of
find/Difficulty of terrain) and how big the cache is at the location ( ).
The "C" column shows you how hard it is to find the cache (Difficulty of
find/Difficulty of terrain) and how big the cache is at the location ( ).
The "D" column is the link to the cache description (which includes the
coordinates of the cache). ).
The "D" column is the link to the cache description (which includes the
coordinates of the cache).
How to read a cache page
For your first cache you probably want to pick one that is near your location,
is a Traditional cache, is easy to find and the terrain is easy (1/1), and is
large (the bigger the red dot the better). The cache "Alto" meets all of these
requirements except it's a small/micro cache. If you click on Alto you should
see something like this:
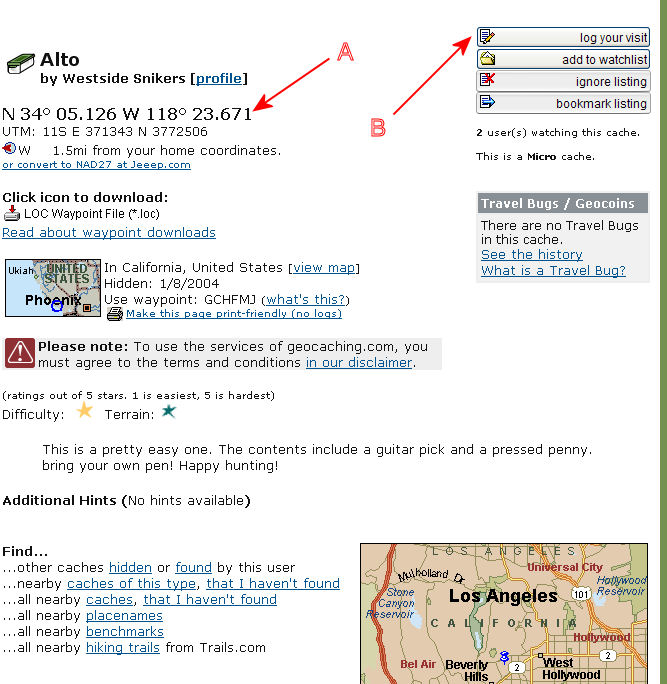
The "A" points to the coordinates you would enter into your GPSr. You can read
the description, any hints, and the log entries, then go out and try to find it.
Once you go out and find it you would log your visit by coming back to this page
and selecting "log your visit" ("B").
That's it for the basics. If you want to ask any questions you can sign up for a
Forum account (select FORUMS on
geocaching.com and you'll go
here to create an
account). You can also surf the Internet for other sites.
Other resources on the Internet
In addition to geocaching.com we also
use other Web pages to help with caching.
Google Map
If you want to get an idea of the cache location you can copy the coordinates
from the cache page and paste it into Google
Maps. Here's what Alto looks like in Google Maps:
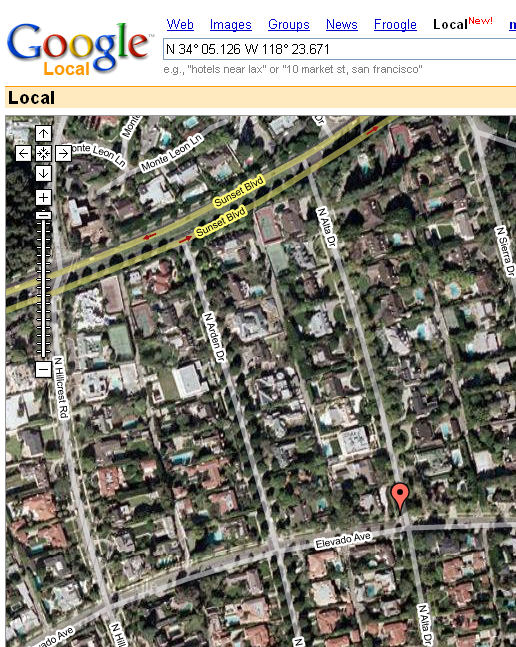
It looks like the cache is located at the Northwest corner of Alta Dr. and
Elevado Ave.
Lostoutdoors.com
If you were interested in the contour lines (because you are out in the
wilderness), you could use the Topo Map on
Lostoutdoors.com to get
another view. Here's Alto from Lostoutdoors.com:
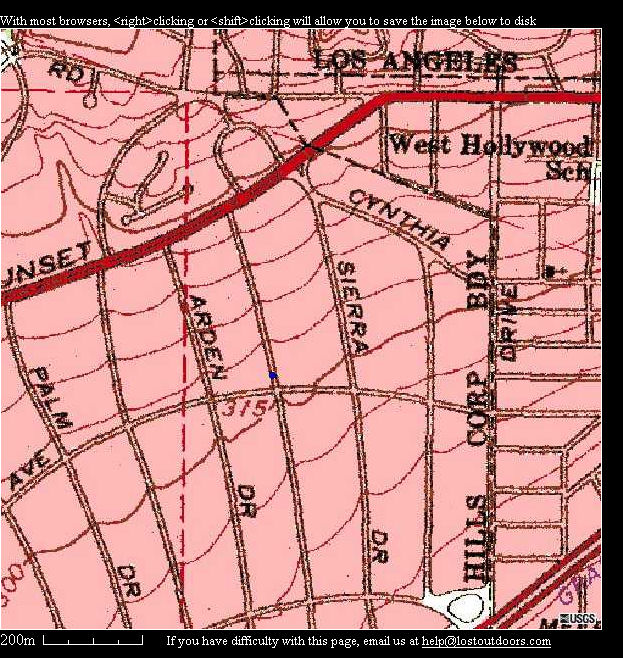
The blue dot is the location of the cache.
Happy Geocaching!
If you have any questions or comments about this page click
here to send
email.
Last Modified:
September 11, 2010 02:12:52 PM
| 